Showing posts with label informatics. Show all posts

Browsing the web safely: some Firefox add-ons


My interest on security and privacy has been growing a lot lately and I found myself using some Firefox add-ons related with security and privacy that I've been installing through time without even noticing it. Here is a list of some Firefox add-ons related with privacy and security you may find useful, none of them will interfere with your navigation or web rendering at all (notice the lack of NoScript) and they are all working on a Firefox 3.6.* on a 32b Linux environment.
There we go:


BetterPrivacy (1):
Some sites use long-term flash-based cookies (LSO) to keep track of what you do or retrieve personal information for third-parties (since they are flash-based they can go deeper than the browser layer), BetterPrivacy deals with them deleting those whenever you close your browser.

Secure Sanitizer :
Secure Sanitizer will securely delete your stored cache information when you ask Firefox to do it, this is useful to be sure that no navigation info will remain recoverable on your disk.


Ghostery (1):


It detects and allows you to block third-parties tracking systems so you don't leave footprints you don't want to leave ;)


PhishTank SiteChecker (1):


A simple add-on that will warn you whenever a site has been reported for phishing practices. It relies on his own list and is a perfect complement for the Firefox warning system.


LastPass (1):


LastPass is a password manager much like a keyring. It will securely encrypt and then store your password on their servers with a master password so you don't need to type in your passwords every single time. It it both useful if you don't want to remember a lot of passwords and protects you against keyloggers. It also performs grid password protection , form autofilling...

 
FlagFox (1):


A very simple add-on that places a little flag close to the URL in the navigation bar, indicating you which country the site you are visiting is. This is useful to look at when you suspect of some sites. It is also bundled which whois, geotools...


Force-TLS (1) and HTTPS-Everywhere (1):
Those add-ons will "force" sites to be served via SSL/TLS secure protocols (https) if available, this will allow you to handle your data securely everytime it is possible to do it.


TorButton (1):


If you already use TOR, this little add-on will help you enabling the proxy configuration for Tor with a simple click. If you still don't know about TOR, have a look !


Extra !

A couple of extra  add-ons:
NoScript (1) as I mentioned before, I find it to be a pain in the neck, but very useful anyway, it blocks any script on the web you are browsing and keeps a whitelist of sites (that you have to make).

FireSheep hast been around for a few months and surprisingly still working, it is an add-on that demonstrates the session hijacking vulnerabilities on some sites just by listening to the network you are in.

Latest Post
Thursday, May 27, 2010

Spotify links on firefox for Linux


Spotify links on firefox for Linux

So you like Spotify and being a Linux user you feel frustrated not being able to open the "spotify:" links on your firefox (> 3.6) browser, after going throught some non-effective solutions, here is the simplest one:

1. Configure firefox

Open the about:config dialog writing it on the address bar in a new tab.

Right-click > New > Boolean and enter :
network.protocol-handler.expose.spotify
then select :
false


2. Configure your system

Now create a new text file wherever you want on you computer, name it "spotify.sh" (or any other name you want, just make sure you remember it !).

Write that on it:


#!/bin/bash
wine "C:\Program Files\Spotify\spotify.exe" /uri "$1"


Save it, you are almost done.


3. Last step

Open a spotify link, like this one. A dialog box will appear:

Click on choose and choose the file you created previously, now, spotify should open with the desired playlist.


Enjoy !

Source: 1

Wednesday, February 17, 2010

HOWTO: SSH tunnelling and securing traffic for networks with closed ports


HOWTO: SSH tunnelling and securing traffic for networks with closed ports

On this howto I am going to show how to connect to any service at any port behind a router that restricts port access with a particular example: music streaming.

Situation:

We are behind a router that restricts some services (or any services) and we want, for instance, to access a service on port 3000 but the network does not allow us to do it (typical work/university situation).

Connection to service on port 3000 is restricted


We will need:
  • A server with full Internet access that we control (say our Desktop PC at home)
  • A running Linux distro on the server
  • The will/nedd to connect to restricted services in another network.
The result:

Access to any service (port) we want on the Internet throught an encrypted connection on any OS (Linux, Windows...).
Now the firewall does not know what on this connection on port 80 :) -click to see a bigger version-


Home machine:

So let's start on our machine at home. We have first to install the SSH server, the package is usually called openssh. Once installed we can open the config file of the ssh daemon: "/etc/ssh/ssh_config" (the path may be different on your distro), it should look like this:

Host *
# ForwardAgent no
ForwardX11 yes
# RhostsRSAAuthentication no
# RSAAuthentication yes
# PasswordAuthentication yes
# HostbasedAuthentication no
# GSSAPIAuthentication no
# GSSAPIDelegateCredentials no
# BatchMode no
# CheckHostIP yes
# AddressFamily any
# ConnectTimeout 0
# StrictHostKeyChecking ask
# IdentityFile ~/.ssh/identity
# IdentityFile ~/.ssh/id_rsa
# IdentityFile ~/.ssh/id_dsa
# Port 22


Now, we suppose our evil-corporation network only allows connections to port 80 to surf the web so we are going to put the ssh server on port 80 to be sure we can connect to it, edit the file (as root) and change the line:

# Port 22

to

Port 80

Now the ssh server is ready to be run, you can leave the rest of the file as it is, we are not interested on the other features of ssh on this howto. So, open a terminal and, as root, run the sshd daemon:
root@mont-blanc ~ # sshd
sshd re-exec requires execution with an absolute path

OOPS, no worries there, we are going to find the path:

root@mont-blanc ~ # which sshd
/usr/sbin/sshd
root@mont-blanc ~ # /usr/sbin/sshd

Done ! Now our server is up and running on port 80.
All of our configuration at home is done, now put on a paper/e-mail, your public IP address and open (redirect) the port 80 on your router/firewall. You can retrieve your public IP on lot's of sites like this one, or this one.


Office/university/whatever machine:

Life is better on Linux, everybody knows that :), we are first going to see how to do it all under Linux.
First of all we are going to connect to our server at home, say for instance your home's IP is 80.90.100.110:

ssh -N -D 2929 -P 80 user@80.90.100.110

Type your password and you are done. Now a SOCKS proxy server is running on your local (office...) machine on port 2929.
-N will prevent a shell to be opened
-D stands for dynamic, which is dynamic port forwarding, every connection to the SOCKS proxy on this port will forward the port (3000 for instance) to our home server on this same port but, through the ssh link on 80.
-P the port of our ssh server
user is your username at home

Now we can configure our applications to use the SOCKS sever, for instance firefox can be set to use a SOCKS server in the preferences->advanced menu. There you must specify the localhost ip address 127.0.0.1 and on this case the port 2929.
Surf the web now, and access http://www.ip-adress.com/ you will see that your IP is the one you have at home.

Ok, but what about applications that have no options or preferences for a SOCKS host ?

proxychains comes to your rescue, download and install it (if you can't find a package for your distro, download the code and just run the usual ./configure , make and make install (as root).

Proxychains will allow us to run any application as if it was connected to the proxy we choose. How ? Proxychains connects to the proxy and when the application wants to connect to a host proxychains redirects the connection.
To configure it open "/etc/proxyhains.conf" and at the end of the file, remove any entry like:

socks4 127.0.0.1 9050

and substitute it by:
socks5 127.0.0.1 2929

Save and close. Now lets try it:

$ proxychains rhythmbox
|DNS-request| radio.hiof.no
|S-chain|-<>-127.0.0.1:2929-<><>-4.2.2.2:53-<><>-OK
|DNS-response| radio.hiof.no is 158.39.172.209
|S-chain|-<>-127.0.0.1:2929-<><>-158.39.172.209:8000-<><>-OK

On this example we opened rhythmbox with proxychains and requested to listen a radio on port 8000, peace of cake :) now the firewall doesn't know what the traffic going through the port 80 is, but allows it and we can connect to a streaming server on port 8000 which otherwise we wouldn't have been able to.

On Windows machines instead of ssh you can use putty like this:

putty -ssh -N -D 2929 -P 80 user@80.90.100.110

and sockscap instead of proxychains.

I hope you enjoyed this article, any comments, suggestions... please comment.


Sunday, January 31, 2010

Curl tutorial: forms, POST, login and upload (from scratch), a practical case


Curl tutorial: forms, POST, login and upload (from scratch), a practical case

If, for some reason, like me, you get tired of going into websites, logging-in, etc... to end up doing a simple and repetitive task cURL may be your best option to get rid of this. CURL is a library (and therefore they have a command-line tool) that can be used to emulate the behaviour of a browser.
Ok, from here I assume some basic network and Linux knowledges, so be aware :)

What we are going to do is from the terminal:

  • Login to zooomr
  • Upload a picture
  • Logout
  • Run it all through a beautiful bash script

 As I a like to do it I'm going to post the code fist, and explain it later:

#!/bin/bash

user=your_user_name
pass=your_pass
file="$1"
cjar="/tmp/cjar"


echo "Logging-in..."

#Log-in
curl \
-s \
--cookie $cjar \
--cookie-jar $cjar \
--user-agent "Mozilla/5.0 (X11; U; Linux x86_64; en-US; rv:1.9.1.7) Gecko/20100105 Shiretoko/3.5.7" \
--data "username=$user" \
--data "password=$pass"  \
--data "gogogo=1" \
--data "redirect_to=http://zooomr.com" \
--data "processlogin=1" \
--location \
http://www.zooomr.com/login/ &> /dev/null
echo "Uploading..."

#Upload
curl -s --cookie $cjar --cookie-jar $cjar \
--header "Accept: text/html,application/xhtml+xml,application/xml;q=0.9,*/*;q=0.8" \
--header "Accept-Language: en-us,en;q=0.5" \
--header "Accept-Encoding: gzip,deflate" \
--header "Accept-Charset: ISO-8859-1,utf-8;q=0.7,*;q=0.7" \
--header "Keep-Alive: 300" \
--header "Connection: keep-alive" \
--header "Expect: " \
--user-agent "Mozilla/5.0 (X11; U; Linux x86_64; en-US; rv:1.9.1.7) Gecko/20100105 Shiretoko/3.5.7" \
--location \
--referer "http://www.zooomr.com/photos/upload/?noflash=okayiwill" \
-F "Filedata=@$file" -F "labels=test" -F "is_public=0" -F "is_friend=1" -F "is_family=1" -F "done=1"  \
http://upload.zooomr.com/photos/upload/process/ &> /dev/null

echo "Logging-out..."

#Logout
curl --cookie $cjar -s http://de.zooomr.com/logout/ &> /dev/null

rm $cjar &> /dev/null


So, this is simple, first call to curl to login, the again to upload, and another time to logout.

  • Firsts things first : Logging-in.
Let's see out website:
http://www.zooomr.com/login/

There are two fields on the login form, username and password, as usual.
Let's take a look at the code of this form:


So, we see the two above mentioned fields which names are "username" and "password", there are also another 3 hidden fields named "processlogin" whose value is 1, "gogogo" and "redirect_to", we will just leave them as they are.
We can also see that the form HTTP method is POST (great ! curl supports that) and the action is /login/, since we are at http://www.zooomr.com/login/ it is obvious that the path to the "action" page is http://www.zooomr.com/login/.
This all means, we will send our user name in the username field, our password in the password field and finally those hidden fields with their original values.

Let's then take a look to the curl command:

21 echo "Logging-in..."
22
23 #Log-in
24 curl \
25 -s \
26 --cookie $cjar \
27 --cookie-jar $cjar \
28 --user-agent "Mozilla/5.0 (X11; U; Linux x86_64; en-US; ..." \
29 --data "username=$user" \
30 --data "password=$pass"  \
31 --data "gogogo=1" \
32 --data "redirect_to=http://zooomr.com" \
33 --data "processlogin=1" \
34 --location \
35 http://www.zooomr.com/login/ &> /dev/null

Here is the line-by-line explanation:
-s
Silent mode, no output

--cookie $cjar
Use this file as cookie (not needed here, since nothing has been collected yet)

--cookie-jar $cjar
Put the values of the sent cookies on this files

--user-agent "Moz..."
You guessed it

--data / -F ...
Are used to specify values of the POST fields (input from forms)

--location
Report if the page has moved

URL
POST method


That was easy ! Now, we are logged on their servers and we keep on session information in a cookie wherever we put it, in our case /tmp/cjar, we will use this file later on so the server knows that we are logged.


  • Uploading the file
It is time to upload the file now. Since zooomr has a fancy (and useless) flash uploader we will use the non-flash version they provide with a regular "Browse..." button and stuff, let's go: http://www.zooomr.com/photos/upload/?noflash=okayiwill
Note that all this parallel process that we are doing is performed in a normal FF browser, but only once, to be able to study the page, once done, we will not be needing to access the site through the browser anymore :) 


 Once again, lets find this form on the code:

...
...

Ok, a bunch of code, here, but do not panic, it is once again the same:
"Filedata" is the field where you have to put the path to your file.
"is_private"... are the privacy preferences we will send the default values.

The "action" page will be http://upload.zooomr.com/photos/upload/process/ but since the URL of the actual page is www.zooomr.. http://www.zooomr.com/photos/upload/process/ will work aswell.

Now, the code, this was a bit longer:


44 echo "Uploading..."
45
46 #Upload
47 curl -s --cookie $cjar --cookie-jar $cjar \
48 --header "Accept: text/html,application/xhtml+xml,application/xml;q=0.9,*/*;q=0.8" \
49 --header "Accept-Language: en-us,en;q=0.5" \
50 --header "Accept-Encoding: gzip,deflate" \
51 --header "Accept-Charset: ISO-8859-1,utf-8;q=0.7,*;q=0.7" \
52 --header "Keep-Alive: 300" \
53 --header "Connection: keep-alive" \
54 --header "Expect: " \
55 --user-agent "Mozilla/5.0 ..." \
56 --location \
58 -F "Filedata=@$file" -F "labels=test" -F "is_public=0" -F "is_friend=1" -F "is_family=1" -F "done=1"  \
59 http://upload.zooomr.com/photos/upload/process/ &> /dev/null
60


First, explanation:
--header
Changes the HTTP header to the specified value, if blank: header is removed
Here, all those headers are NOT needed, but I leave them for "educational" purposes, here is a typical HTTP request:

GET / HTTP/1.1
Host: www.google.es
User-Agent: Mozilla/5.0 (X11; U; Linux x86_64; en-US; rv:1.9.1.7) Gecko/20100105 Shiretoko/3.5.7
Accept: text/html,application/xhtml+xml,application/xml;q=0.9,*/*;q=0.8
Accept-Language: en-us,en;q=0.5
Accept-Encoding: gzip,deflate
Accept-Charset: ISO-8859-1,utf-8;q=0.7,*;q=0.7
Keep-Alive: 300
Connection: keep-alive
Cookie: PREF=ID=5d58514db6...blablabla


As you can see I tweaked it all so curl would send the same headers as FFox, this is really not needed but I wanted to do it, "for fun".

There is one last header: "Expect", this header has no value, so it is removed.
It happens that CURL adds this header (that indicates what reply the client expects), but the server didn't liked it, and replied a "417: Expectation Failed" error. A simple look through the headers FFox sends helped me to find this out, you can do it with an add-on called live http headers or with wireshark.

Also, to specify a file to upload, yo can not put all the bytes of the file behind the = sign, so @/path/to/file will do the trick and curl will send the file for you.


  • Logging-out: newbie stuff ;)
I'm sure by now you can figure it out by yourself.


Now, try it out, copy the code in a file, configure your username and pass,  "chmod +x  the_file.sh" and run it putting as parameter the path to the file.
If you have read it all carefully you should be able to to that for lots of services online. Remember that CURL works with SSL (https) just as good as without it.

Comments ? Suggestions ? Go and leave me a comment :)

-btw, credit for the logout line goes to: up2zooomr-


UPDATE:
I just made a little GUI version, so you can call it from a file manager or from a console with a parameter, it also adds the possibility to add a title and tags to your picture:

./zooomrUpload /path/to/file
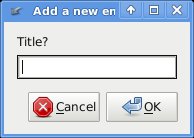


Get it here.
Please be aware that the whole thing is not very user-friendly, that means, no error control and few work on the usability. Anyway, I hope you enjoy !

Blogger templates

A cœur vaillant rien d'impossible.
Powered by Blogger.

Labels

About